When I go to the gym, I try to keep things as simple and efficient as possible.
I’m a huge supporter of pull ups and chin ups, as those are the exercises that are a great test of somebody’s fitness level.
There’s just something inherently badass about being able to lift up your entire body, which is why competitions like Ninja Warrior require ridiculous back and bicep strength.
I know many people reading this article could be just getting started with fitness training, and doing a pull up seems like an absolute impossibility.
That’s okay! I’d guess that 80% of this country probably can’t do a pull up either, so don’t beat yourself up too much. Just because you can’t do a pull up now doesn’t mean you shouldn’t work out your back.
We HAVE written a resource on how to get your first pull-up here, but let’s start with the steps before that!
I have just the exercise for you instead: the bodyweight row! It’s a great exercise you can work on as you start to delve deeper into the wonderful world of strength training!
The Bodyweight (Inverted) Row
So what the hell is an inverted bodyweight row you ask?
GREAT QUESTION. In fact, it’s a question I get all the time in emails, so I figured I’d add it to the repertoire of explained exercises here on Nerd Fitness.
I’ll be using “bodyweight row” and “inverted row” interchangeably in this article.
You’ve probably heard of the regular barbell row. You pick up a barbell, bend over at the waist (keeping your back straight), and pull the weight up towards your chest.
This can be a great exercise, but improper form could cause complications or not give you a great workout!
Luckily, the inverted row takes care of all of that. You get to use your body weight, and there’s no extra stress on your back. As an added bonus, you get a decent core workout too.
This exercise has been referred to as the reverse bench press, as you grab a bar like you were getting ready to bench press it, but instead of lifting the weight down towards you, you’re pulling your body up towards the bar. Think of it like this: “benchpress” is to “pushing” as “inverted row” is to “pulling.”
Balance FTW!
Why the inverted bodyweight row is so great: I’m a huge fan of compound exercises (like the squat and deadlift, pull-ups and push-ups), and I’m also a huge fan of exercises that don’t require expensive machines or lots of extra bells and whistles.
An inverted row works all of your pull muscles: your back, biceps, traps, and all the stabilizer muscles in between. If you’ve been doing just pushups and bench presses, you need to start doing an equal amount of work with your back to stay in balance and away from injury.
If you want to eventually be able to do pull-ups, THIS is the exercise you need to add into your routine until you can do a full pull up.
Speaking of which, if you are just getting started with bodyweight rows to eventually do a pull-up, download our free, comprehensive guide, Strength Training 101: Everything You Need to Know.
In it, we have workout plans to follow whether you’re at home doing bodyweight training or at the gym with weights. Put your email in the box below and I’ll send you the guide free so you can get started today!
- Everything you need to know about getting strong.
- Workout routines for bodyweight AND weight training.
- How to find the right gym and train properly in one.
How To Do An Inverted Bodyweight Row
Let’s start with the people who have access to a gym (see a variation for No-Gym people at the end). You know I hate machines for pretty much every exercise, due to the fact they restrict your body’s natural tendency to move.
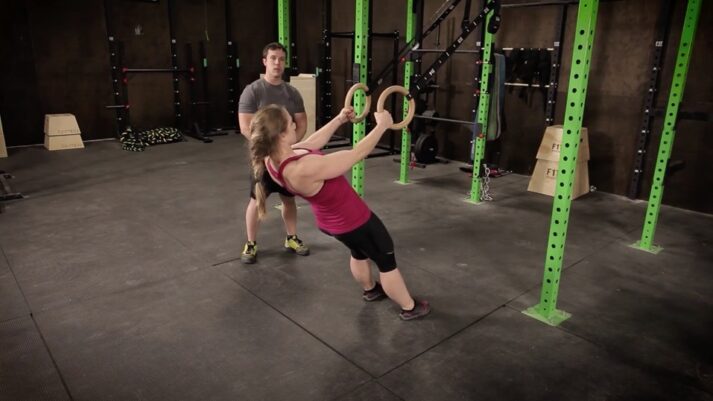
I grabbed a video of Staci from Team NF demonstrating a bodyweight row with gymnastic rings from our premium course (The Nerd Fitness Academy), but don’t worry if you don’t have rings – you can see how to do them with a Smith Machine or barbell under this demonstration.
How to do a bodyweight row with explanation:
If you don’t have rings, here’s Staci demonstrating the same movement, just with an anchored barbell in a squat rack:
- Lie on the floor underneath the bar (which should be set just above where you can reach from the ground).
- Grab the bar with an overhand grip (palms facing AWAY from you).
- Contract your abs, and try to keep your body a completely straight line. Your ears, shoulders, hips legs, and feet should all be in a straight line.
- Pull yourself up to the bar until your chest touches the bar.
- Lower yourself back down.
If you’re still struggling and they’re too difficult, it’s okay. We just need to back up a few steps. Set the bar higher so that when you lean back, your body isn’t down on the ground; maybe it’s only at a 45 degree angle.
Here’s Staci again demonstrating it at a higher angle:
By setting the bar higher and your body higher, it takes more of your body weight out of the equation. As you get stronger (and/or lose weight), you’ll be able to drop the bar until you’re parallel when pulling yourself up.
Some tips and tricks:
- Don’t let your butt sag (squeeze your buttcheeks, flex your stomach, and keep your body rigid from head to toe).
- Don’t flail your elbows. Grab the bar with your hands a little closer than you would if you were doing a bench press, and keep your elbows at that angle from your body.
- Pull the bar towards the middle of your chest. Don’t pull the bar up towards your throat, or down towards your belly button. Right in the middle!
- Keep your abs tight. Keep your abs tight throughout the whole routine. Your body should be a straight line the whole time, and the only thing moving is your arms
- Think of pulling your shoulder blades together at the top of the exercise.
- GO all the way. Don’t half-ass it. Lower yourself until your arms are completely extended, and raise yourself until your chest touches the bar.
When should you do this exercise:
When I go into a gym, my time is extremely limited, and I’m working towards developing strength. I’ll try to do one leg exercise (either squats or deadlifts), followed by a pushing exercise (either bench press or overhead press), and then a pulling exercise (pull ups or inverted rows). Here’s a sample two day split for me:
- Day 1: Squats, bench press, inverted rows, dips
- Day 2: OFF
- Day 3: Deadlifts, Overhead Press, Pull Ups (or chin ups), Planks (Floor Swipes).
- Day 4: OFF
Both days work my full body, I can do a full routine in less than 40 minutes, and I’m building strength. If you can’t do dips on Day 1, you can do pushups. If you can’t do pull ups on day 2, you can substitute assisted pull ups or lat pull downs (although I don’t like lat pull downs very much).
On the rows, aim for 3 sets of 10. If you can’t do that, do 3 sets to exhaustion, and build your way up to 3 sets of 10. Once you can do that, put your feet up on a chair, throw some weights in a backpack, put it on reverse (so the bag is hanging in front of you), and then do the rows.
You got this.
If you are doing this on your own, but are overwhelmed and confused about strength training, I know how that feels. It can be scary enough to keep MOST people from starting, which is actually why we created our 1-on-1 Coaching Program. Our coach gets to know you, builds a program based on your experience and goals, will check your form on each movement (via video), and keep you accountable and on track!
You can learn more about our coaches and schedule a free call with us by clicking the image below:

What if I don’t have access to a gym?
Just because you don’t have access to a gym doesn’t mean you can’t work out your back, you just need to get VERY creative. Try these few things for example:
- Get a really thick wooden dowel or pipe, something strong enough to support your weight. Lie it across two of your kitchen chairs, and then lie down underneath it. Make sure its sturdy, and the bar isn’t going to break/move on ya, and pull yourself up.
- Use your kitchen table. Or your desk (if it’s in the middle of the room and doesn’t have a back). Be very careful with this one. Lie underneath your table so your head and shoulder are sticking out above it. Grab the table edge with an overhand grip, and pull yourself up (just like it’s explained above). Warning, don’t pull the table over with you, and make sure you’re not gonna break the thing. Obviously this is a pretty crude way to get the job done, but it works.
Don’t forget, you want to stay in balance. Don’t just do push ups at home if you can help it, try to work out your back too. If you don’t have a pull up bar, find a way to do some bodyweight rows whether it’s between two chairs or under a table. You’re smart, get creative.
Here’s a video of me explaining how to do Inverted Body Weight Rows using just my kitchen table:
This is a great movement that can help you get started to building up your often ignored pull muscles. If you have poor posture, and spend all day at a desk hunched over a keyboard, mixing in bodyweight rows to your routine can be incredibly beneficial!
Any more questions about the inverted bodyweight row? Leave em below!
-Steve
PS: Be sure to check out the rest of the Strength Training 101 series:
- Strength Training 101
- Strength Training 101: Equipment
- Strength Training 101: Finding the Right Gym
- Strength Training 101: Where do I start?
- Strength Training 101: How much weight should I be lifting?
- Strength Training 101: How to Squat Properly
- Strength Training 101: The Overhead Press
- Strength Training 101: The Deadlift
You can also get the guide free when you sign up in the box below and join the Rebellion!
- Everything you need to know about getting strong.
- Workout routines for bodyweight AND weight training.
- How to find the right gym and train properly in one.
PPS: Looking for more specific instruction? I’ll again remind you of our 1-on-1 Online Coaching Program! Your own Nerd Fitness Coach who will get to know you, your goals, and your lifestyle, and develop a workout plan (with rows) that’s specific to not only your body, but also to your schedule and life.
###
No comments:
Post a Comment